The data organised in rows and columns is called a table. The horizontal stripe of a table is called its row and vertical stripe is called its column or field. A row is the information about one item or one person where as a column or field is the information about one kind of data of different items/person. With the help of a table we can easily organise the large amount of data in structured and understandable way. We can easily create a table in HTML web page.
Q. How we can create a table in HTML.
Ans. <TABLE> TAG is used to create a table in HTML. This is the starting tag to start a table, then we use <TR> (Table Row) tag to create a row in the table. <TH> tag is used to create column or field heading in a table. <TD> tag is used to create table data.
The syntax to create a simple table with 1 row and 2 columns is as follows :
<TABLE>
<TR>
<TH> data </TH>
<TH> data </TH>
</TR>
</TABLE>
Lets understand it in detail. First we start with <TABLE> tag, after typing the starting tags like <HTML>, <HEAD> and <TITLE> etc. (For detail about starting tags go to the link INTRODUCTION TO HTML)
Open notepad and type the following opening tags
<HTML> (This assigns that it is an HTML file)
<HEAD> (This assigns that document's heading area starts)
<TITLE> My First Web Page</TITLE> (The text between both opening and closing <TITLE> tag is the title of the web page)
</HEAD> (This assigns that heading area is now finished)
<BODY BGCOLOR = "Aqua"> (This indicates that document's body or main content starts with background color "Aqua"
<TABLE> (This tag says now we start creating a table)
<TR> (This tag creates a table row)
<TH> Roll No </TH> (TH tag creates a field or column with data "Roll No." and </TH> tag means this field is over now.)
<TH> Name </TH> (Now second field appears with data "Name".
</TR> ( This means that this row is terminated now)
</TABLE> (This assigns that the making of table is over.)
</BODY> (Body area of document is over)
</HTML> (HTML Document is completed now).
Now we save the file with any name but extension must be .htm or .html. Now it appears as a browser, click on that browser, the result will be as follow:
|
Roll No. |
Name |
Try above program in try it editor:
| Output |
Border="1" and bgcolor="aqua" are the attributes of <table> tag, Further we'll know in details.
Let's see the other example with 3 rows and 4 columns with the data as follow:
<TABLE Border = "1">
<TR> (First row starts with 4 columns heading)
<TH> ROLL NO</TH>
<TH> FIRST NAME</TH>
<TH> LAST NAME</TH>
<TH> ADDRESS </TH>
</TR> (First row is now over)
<TR> (Second row starts now with 4 fields or columns)
<TD> 1 </TD>
<TD> ANSH </TD>
<TD> MEHTA </TD>
<TD> NEW DELHI </TD>
</TR> (Second row is over)
<TD> 2 </TD> (Third row starts now)
<TD> JIYA </TD>
<TD> KUKRETI</TD>
<TD> NOIDA </TD>
</TR> (Third row is over)


| Output |
Attributes of <Table> Tag :
- BORDER
- CELLPADDING
- CELLSPACING
- HEIGHT
- WIDTH
- BGCOLOR

 | |
|

 |
| A table having values of attributes cellspacing "15", width = "90%, height = "30%" and bgcolor "yellow" |


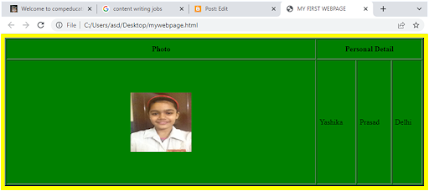 |
| Columns "First name", "Second name" and "Address" are merged into "personal detail" |

 |
| Text having Alignment "center", font color "orange", size "6" and font face "Algerian" |
| Output |
- Presentation tag in HTML
- Creating list in HTML
- Adding image in HTML
- Creating table in HTML
- Creating form in HTML
- HTML Link(External & Internal)
- Embedding Multimedia Objects in HTML
- CSS(Cascading Style Sheet)
- Introduction to JavaScript
- Introduction to HTML


No comments:
Post a Comment